Hello everyone! My name is Stephanie and I work as a customer-facing Software Engineer at Microsoft.
Recently, I worked with a large manufacturing customer to digitally transform their factories with the goal of improving the productivity of their plants and workers, as well as the quality of their produced goods. One of the customer requirements for this project was to implement Veracode into their development process in order to help with security testing and to identify potential issues in code.
Personally, I was new to the Veracode platform, and so I spent quite some time with the Veracode team and the customer team to design the right scan flow for our use case. In this blog post, I would love to share our setup and findings with you so that you can use this as inspiration for your own Veracode implementation!
First I will briefly introduce our scenario, then go into the different user stories we identified for the different scan types I will shortly introduce the different scans, and I will conclude with the main challenges we faced and how we solved those. In this GitHub repo, you can find the accompanying Azure DevOps pipeline yaml files to easily get started with your own pipelines.
Setting the Stage: Our Scenario
In this project, we worked with a large mono-repository spanning many different teams, projects, developers, and languages. In one month, we would have 500+ opened pull requests and 8400+ commits by 100+ developers, across projects in .NET, JavaScript, and TypeScript. We used Azure DevOps to collaborate, share our code, and automatically build and test projects. Developers would branch off of the dev branch into feature branches and would merge those feature branches back into the dev branch via pull requests. For production, the dev branch would be merged via pull request into the main branch.
Developer User Stories
We wanted to use the Veracode platform for static code analysis in multiple stages of the development lifecycle, so that we could ‘shift left’ and move security earlier in the development process with the goal of discovering flaws as soon as possible, making them easier and less costly to fix. To get an understanding of which scan type would make sense at what stage of the development process, we identified four user stories:
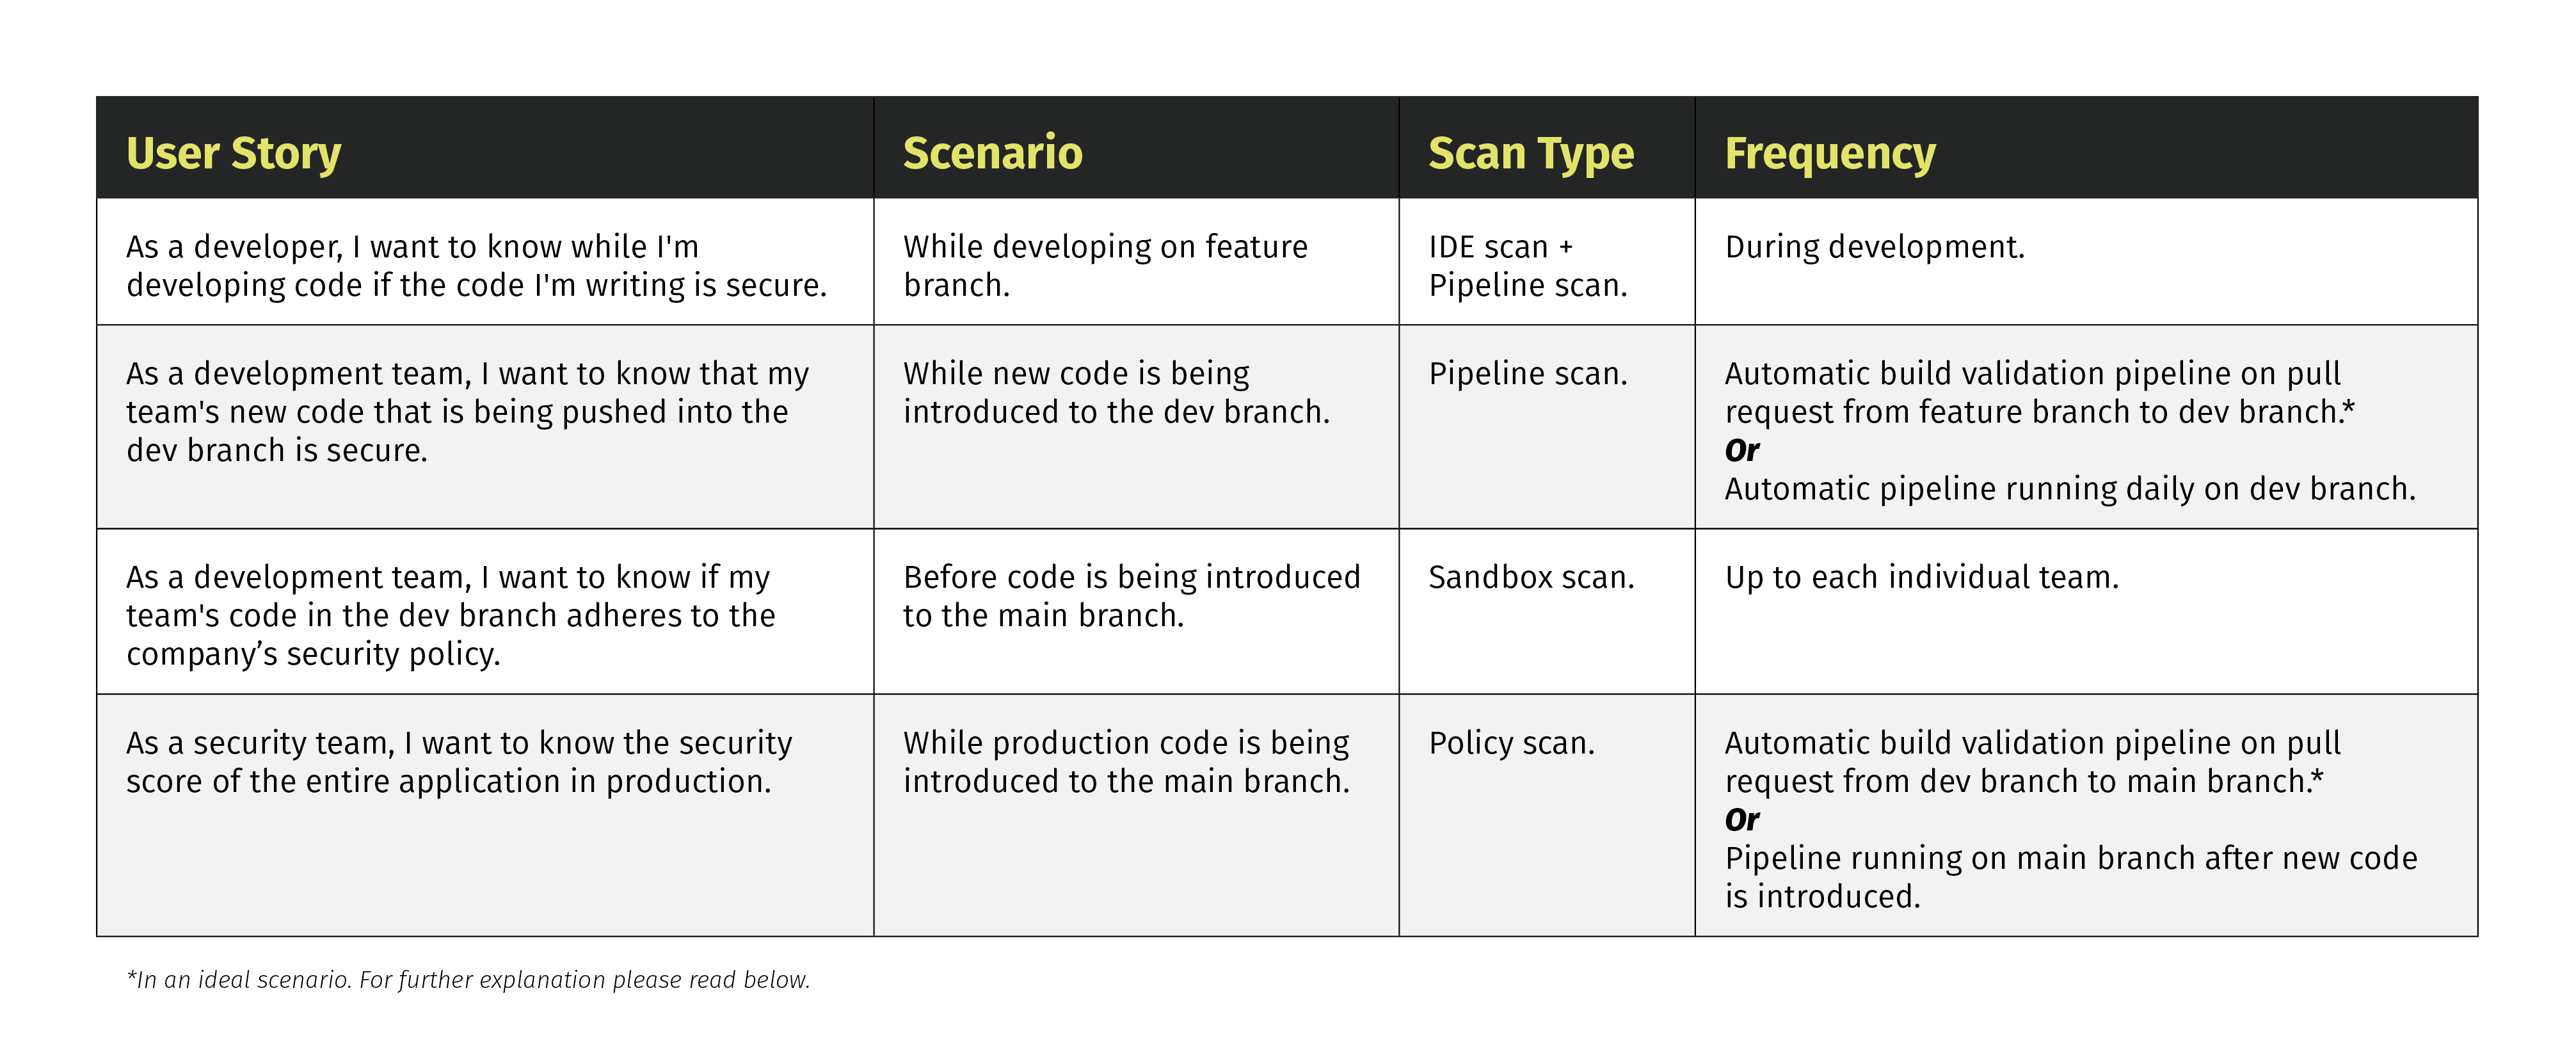
The Four Scan Types that Cover My Code, Our Code, and Production Code
Now let’s get into details about the static scan types that we use to address the developer user stories above. In case you’re new to the Veracode Static Scan, here’s an overview of the three most common static scan types and how each scan type fits into the software development process.
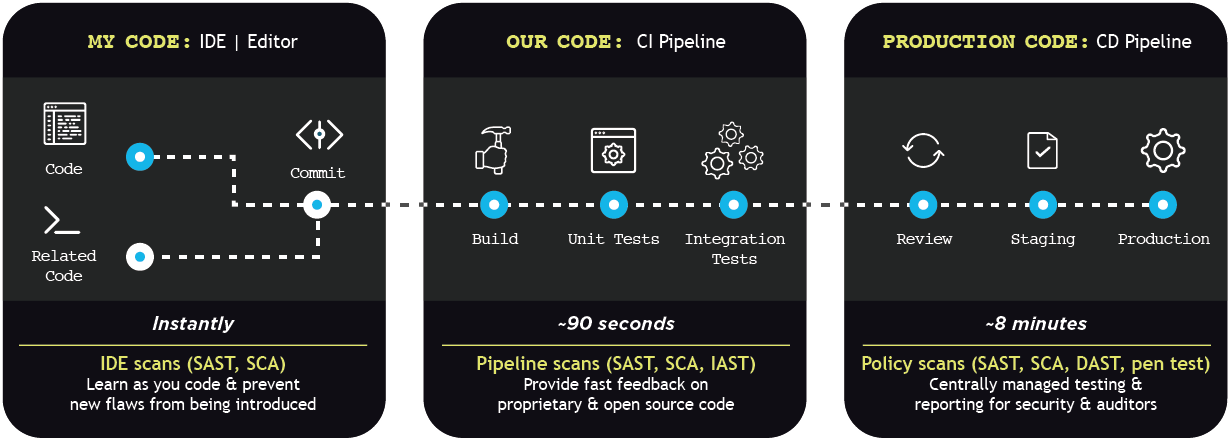
Veracode IDE Scan (Formerly Greenlight)
As the earliest security step in the development process, we enabled all developers to set up Veracode IDE Scan in their own IDE so that everyone could immediately find and fix security› errors while developing through real-time static analysis scans of the source code. Veracode IDE Scan is very fast, making it a painless experience to go through as a developer – yet it is important to note that Veracode IDE Scan only supports scanning per file and the file is not analyzed in the context of the broader application. This means Veracode IDE Scan might find some security flaws, but that additional flaws might show up in scans where the scope is larger – hence the need for other scans later in the development cycle, like Pipeline Scans or Sandbox Scans.
Veracode Pipeline Scan
As mentioned, Veracode IDE Scan is a great first step in the development process, but scanning the entire built application can surface security flaws that would not have been recognized when just scanning a file individually. We, therefore, implemented Veracode Pipeline Scan as a more comprehensive scan for developers to check if their code doesn’t introduce new security flaws. This pipeline scan finds more flaws than the IDE scan but also takes longer; so we introduced it as a stand-alone optional Azure DevOps pipeline, where developers could simply run the pipeline on their branch whenever would suit them.
Additionally, we tried introducing the Pipeline Scan as a mandatory pipeline to run upon pull requests from a feature branch to the dev branch, but due to running time challenges (as will be further explained in the ‘challenges’ section of this blog) we pivoted towards running the Azure DevOps pipeline with the Pipeline Scan daily at 5 AM on the dev branch. The results of the pipeline could then be used by developers to start fixing their code.
Looking at the specifics of the Azure DevOps pipeline we created for this, the pipeline would first download and extract the Veracode pipeline scan; and it would then zip up and scan all files in the repo per file type per step – meaning that we would first scan all JavaScript files, then scan all TypeScript files, and then scan all .NET files.
We set up this ‘per file type per step’ logic to make it more straightforward for the developer to discover if their files introduced errors. For example, if a developer made a change in a JavaScript file, it would be easier to see the ‘JavaScript’ step failing instead of the failure of one general step.
Continuing this Veracode journey, we are currently looking to introduce logic in the pipeline so that only all file types are zipped up and scanned based on the type of the changed file. So then, if a developer would only make changes in .NET files, only all .NET files would be zipped up and scanned.
Veracode Sandbox Scan
The overall security of the entire application is measured by the customer’s security team using the Veracode Policy Scan. This scan counts towards the policy compliance score of the application and is used for compliance reporting, for example. The Veracode Pipeline Scan scans files in the context of the larger application but removes some of the security auditing and policy features.
Before we submit our code to the Veracode Policy Scan, we want to make sure that our code is as compliant as possible when measured against the customer’s policy, as to not lower the compliancy score of our application. To do this, we introduced Veracode Sandbox Scans to our project. A Veracode Sandbox Scan is a private area for a team to perform a final check to see how secure their code is. Its results do not count towards the overall policy compliance score of the application.
We defined that each team needed to perform a Sandbox Scan on their files in the dev branch at least before a pull request from the dev branch to the main branch. We enabled each team to create their own team Sandbox and to create an Azure DevOps pipeline to execute the team-specific Sandbox Scans.
Veracode Policy Scan
At last, the scan that we’ve been working towards – the Veracode Policy Scan! As mentioned, this scan measures the overall security of the entire application and its results count towards the policy compliance score of the application.
Initially, we thought of simply zipping up all files of the entire repo and scanning it upon pull request from dev to main, but because of the very long running time of this (see the ‘challenges’ section of this blog), we decided to run the Veracode Policy Scan on all files in the main branch once the main branch was updated with new code.
Our Main Challenges
As with the implementation of any tool, we did encounter some challenges along the way. These are the top challenges we had and how worked around those.
Scanning times and upload size
Partially due to the large size of our mono-repository, our main challenge was the long-running time of the scans.
As mentioned before, initially we introduced the Pipeline Scan as a mandatory pipeline to run as part of a pull request from a feature branch to the dev branch. But the long-running time of the overall pipeline (about 30 to 40 minutes or longer) in combination with the large number of PRs, clogged up our Azure DevOps agents and reduced our overall PR completion speed. This made it challenging to use the pipeline scan as a gatekeeper for flaw-free code upon pull request from feature to dev.
Instead, we decided to manually run the pipeline scan on the dev branch every morning at 5 AM, and trust that the teams would check daily if their code introduced security flaws so that those flaws could be fixed immediately.
If your overall pipeline does not run that long, I would still highly recommend using a pipeline scan as a gatekeeper in your pull request process so that developers can use the outcomes to fix their code before their code is merged into dev.
We encountered another example of these long scanning times when executing the Policy Scan – when uploading the entire repository, the estimated scanning time would be three days! This evaporated the possibility of running the Policy Scan as a gatekeeper on a pull request from the dev branch to the main branch, and we, therefore, decided to only run the Policy Scan when the code was already merged in the main branch.
Additionally, we sometimes had to make concessions on what code we decided to upload for scanning. In the above-mentioned case of the Pipeline Scan, we only scanned first-party code because including all code would create a pipeline running for 1+ hours. This, however, meant that a list of files to be scanned must be maintained in code, and any manual maintainable list is prone to human errors.
Using credentials across teams and developers
As there are quite some credentials needed for the above Veracode scanning flow, it is important to consider where you will store these. The service principals used by the pipelines can easily be stored in Azure Key Vault and linked to Azure DevOps. But additionally, developers need API credentials to set up Veracode IDE Scan, and they need credentials to log into the Veracode portal.
You need a way to store these credentials somewhere safely in a way that all developers still can access. For this specific purpose, we decided to create a separate Azure Key Vault with reading access for all developers so that if a developer would need those credentials to log into the Veracode portal or to set up Veracode IDE Scan, they could simply copy them from the Key Vault.
When will you scan
Lastly – every project is different. I would highly recommend you looking at your exact development process and deciding when it makes sense for you to scan. The last thing we want is frustrated developers (for example, because they want to quickly merge a bug fix but they have to wait 40 minutes for a pipeline to run), so think about how you can make the scanning flow as painless as possible. Also, it only makes sense to perform any scan when you are sure you are going to act on the results, so beware of scanning for the sake of scanning. Personally, creating user stories as above was a great way for us to better understand where and when a Veracode scan made sense.
Summary
As a developer, you want to make sure that the code you write is designed with security in mind so that there are no security flaws and potential vulnerabilities in the codebase which can be taken advantage of. Veracode definitely helps with this, but it takes some planning to create a useful and painless scanning flow for all developers. I hope that this blog gave you some insight into how we thought through this process. If you have any further questions, always feel free to reach out via LinkedIn!
Stephanie Visser
Software Engineer @ Microsoft
.png)
